

So you’ve had your PlayStation 4 a few months now. Whilst the game catalogue is not huge by any stretch of the imagination, there’s still enough out there to fill up its paltry 500GB hard drive that Sony packed into their respective console.
If you have a moderately large gaming budget or, like me, you review a lot of games your console hard drive(s) may be starting to bulge a bit with all those games installed on them.
If they are not bulging now, they soon will be. I can count almost twenty absolutely must-have games between the Xbox One and the PS4 coming out between now and Christmas. Even if you only pick up a few games between now and then, that drive capacity of yours isn’t going cope for long into the New Year. Soon you will start getting warnings like this on your PS4.
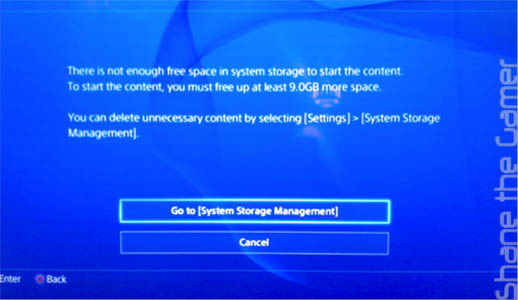
In real terms what does this mean? Well, I’ve got about 22 games installed- some of which are only relatively small PSN games. If I record a few game clips I usually get a warning. The lack of hard drive space also means I can’t update games.
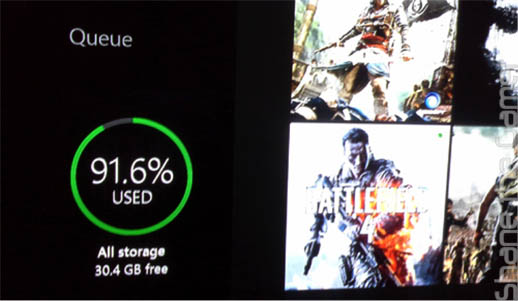
Even my Xbox One with its twelve games is getting close. Being mindful of the likes of the Xbox One exclusive Halo: Master Chief Collection, Sunset Overdrive and Forza Horizon 2 rapidly approaching, that last thirty gigabytes of space isn’t going to stretch far beyond Christmas.
What can you do about this? Well, there is a way to double both your PS4 and Xbox One hard drive capacity to 1TB each for just over AU$100.
And here’s how.
Whilst the Xbox One’s hard drive is locked away from end-user access, the folks at Sony- in a similar way that they did with the PS3, have designed the PlayStation 4 in such a way that the hard drive can be easily replaced.
You may not be able to swap out the hard drive in an Xbox One, with the recent June 2014 firmware update you can now use an external USB 3.0 hard drive for storage.
In order to efficiently upgrade both machines we are going to replace the PlayStation 4’s 500GB 2.5” HDD with a 1TB drive.

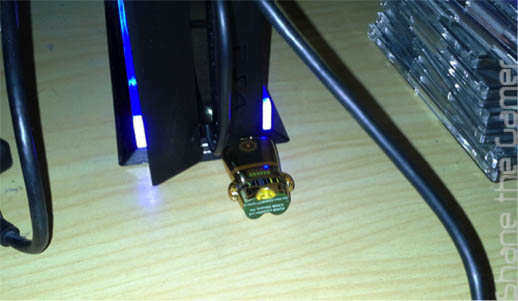
We are then going to place the old 500GB PS4 drive in a USB 3.0 HDD enclosure and attach it to our Xbox One. The end result will be to double the storage in both machines for just over AU$100.
First we need to prepare the PS4 for the upgrade and gather all the tools to do the job.
Replacing the PS4 hard drive is going result in your PS4 being reset to its factory settings. All your installed and downloaded games will be gone, as will your saved games. Any videos and screenshot that you’ve not uploaded to Twitter or Facebook will also be lost.
Whilst, unfortunately there’s nothing that you can do about your installed games, your game saves can be backed up. Even your videos and screenshots, if you are particularly attached to them, can be backed up as well.
I wasn’t fussed about my saved videos or screenshots and just got rid of them, but if you are they can easily be transferred to a connected USB memory stick or external drive.
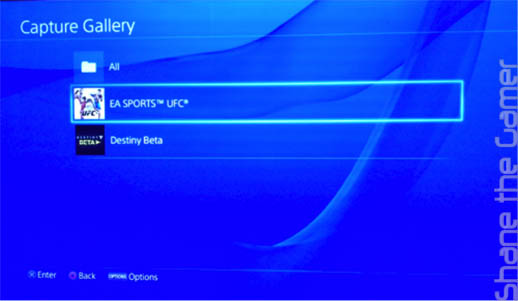
You can locate your stored videos and screens for the PS4 menu by going to [Settings] > [System Storage Management] > [Capture Gallery] then select the game and highlight the video/screen you wish to keep. Press the Select button on the PS4 controller and then [Copy to USB Storage Drive] from the menu on the right. You’ll need to do this for each individual file.
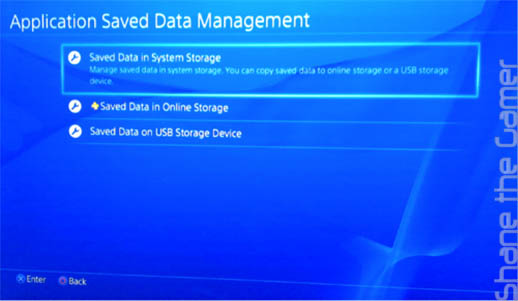
Backing up saved games to USB isn’t quite so laborious. First plug your USB stick or drive into the PS4. Then, from the Ps4 menu, go to [Settings] > [Application Data Management] > [Saved Data in System Storage] > [Copy to USB Storage]. You then select your game select [Select All] and [Copy]. Do this for each game.
If you’ve got a PlayStation Plus subscription you will see another option if you go, from the PS4 menu, [Settings] > [Application Data Management]. PS Plus subscribers can have the PS4 copy game saves to the PlayStation cloud storage servers. The option [Upload to Online Storage] allows you to select local saves and back them up in the cloud.
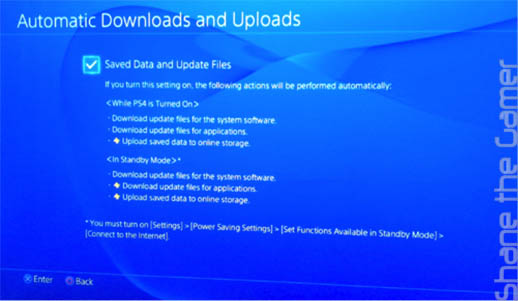
With a bit of luck, if you have a PlayStation Plus subscription your PS4 has been dutifully uploading copies of your saves to the cloud server automatically. To check if this is the case got to [Settings] > [System] > [Automatic Downloads and Uploads]. If the box next to [Save Data and Upload Files is ticked then the chances are your save files are already backed up for you.
It’s also worth checking [Settings] > [Power Saving Settings] > [Set Functions Available in Standby Mode] to see if [Connect to the Internet] is ticked. Make a note to check all this again when the new HDD has been installed.
Even if you have got a PS Plus subscription, it’s best to be on the safe size and just check that the cloud saves are there. From the menu go to [Settings] > [Application Data Management] > [Saved data in Online Storage].
Select a few games, one-by-one, and check the files and the dates (choose games you have played recently to check that they are being updated). There’s no need to transfer the file, we are just looking in the cloud storage to check that the saves are there.
Be mindful that when restoring backed up saves you must be signed in with the same PSN account used when you copied the data.
If you are happy that you’ve backed up what you want to keep and/or your saved games are safely stored online we can proceed.
With the housekeeping out of the way, we are going to need a few things to successfully replace the PS4 hard drive and upgrade the storage.
The new hard drive is going to be blank when you install it in your PS4, so you are going to need to download the system software from the internet and put it on a USB memory stick.
You can download the PS4 system software from here: PlayStation Australia or here PlayStation New Zealand.
They may be the same file, but just to be on the safe side use the software for your country. If you PS4 isn’t an Australian or New Zealand model go onto your country’s PlayStation site and search for “upgrading PS4 hard drive” you should find the corresponding file for your machine.
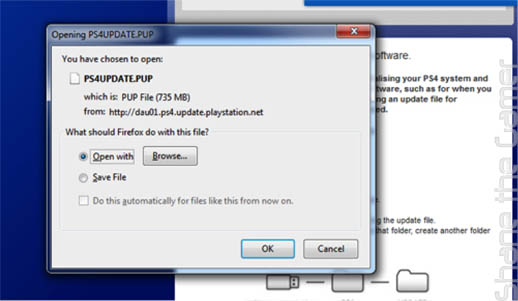
After downloading the file you need to create a couple of folders on your USB memory stick.
First create a folder named PS4. Inside that folder, create another folder named UPDATE. Be sure to use capitals otherwise it will not work. Save the downloaded system software, which should have the name “PS4UPDATE.PUP” in the UPDATE folder.
It’s really important to make sure that the system software is in the right, correctly labelled folders otherwise you won’t be able to get your PS4 running again after you put the new drive in.
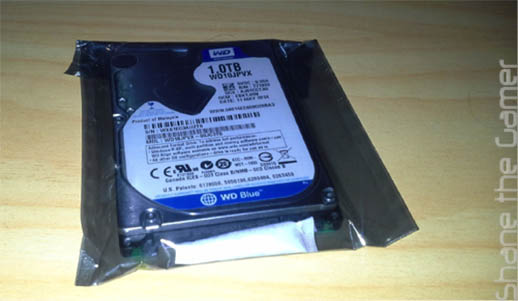
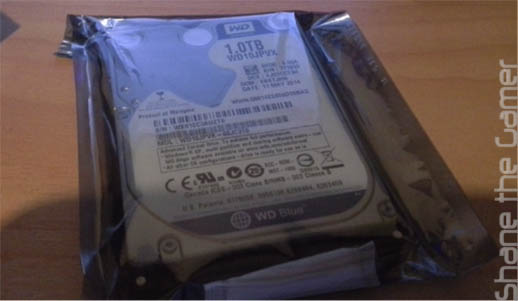
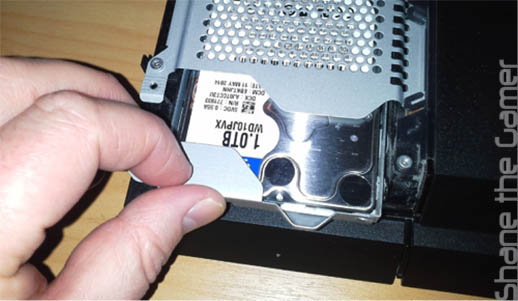
As a replacement hard drive I’ve chosen a 2.5 inch Western Digital 1TB SATA drive (WD10JPVX). It cost me eighty-five bucks from MSY in Sydney. There are some considerations to take into account when choosing a replacement hard drive, which I’ll go into later. For now, this hard drive gives us a decent storage capacity increase for a good price.
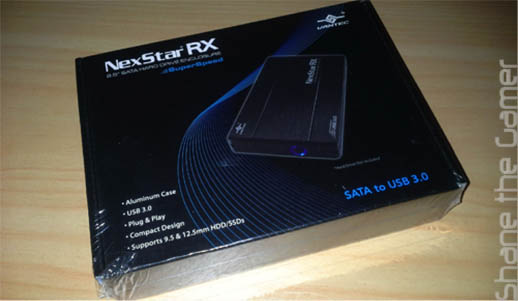
Once we get the stock 500GB drive out of the PS4 we are going stick it in a USB 3.0 enclosure and plug it into the console. I’ve picked a nice-looking black aluminum 2.5” HDD enclosure, a NexStar RX, from Vantec. I also picked this up from MSY, for a whopping AU$23.
The only actual tool that you are going to need is a Phillips (cross-head) screwdriver.
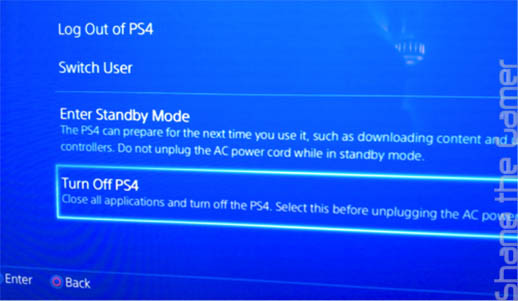
It’s important, before you replace the PlayStation 4 hard disk drive, to ensure that it is completely switched off. When the power indicator is off, the system is completely off. If the power indicator is lit up in orange, the system is in standby mode.
Make sure the PS4 is completely switched off and unplug the AC power cord. Then disconnect the other cables from the system.
It is a good idea to move the unit to a clean flat surface that gives you a bit of room. Don’t try and change the hard drive with the unit balanced on your knee or sitting on the carpet. Whilst the console was designed to have the hard drive swapped out, you’ve still got to be sensible about it.
With the PlayStation 4 disconnected now’s a good time to give it a clean. The vents have likely sucked up a bit of dust. If you are careful, you can vacuum the dust out. If you are a bit mental or suffer from the shakes, please don’t put your vacuum cleaner anywhere near your console. You can also wipe the PS4 down with a damp cloth. And by damp I mean barely wet.
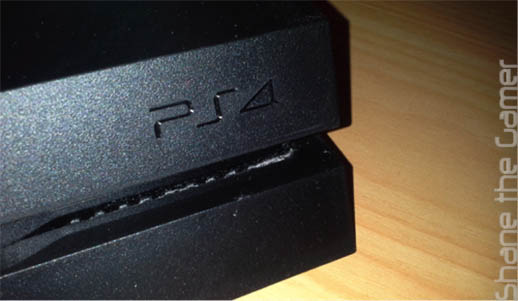
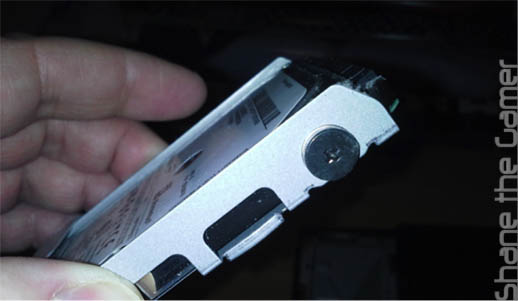
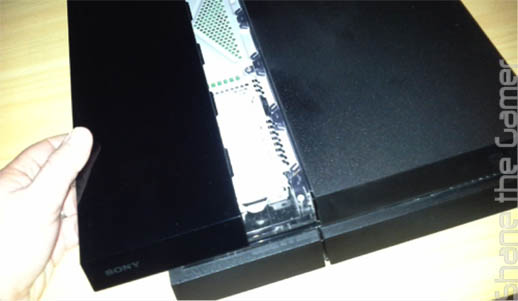
It’s now time to open the thing up. The PlayStation 4’s hard drive is located under the shiny panel on the left side of the console.

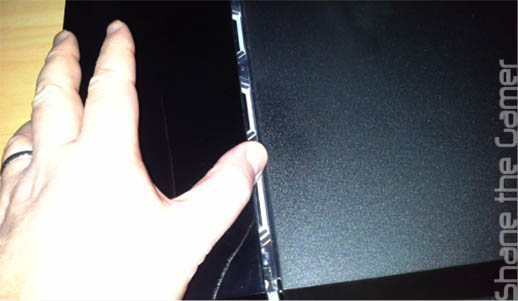
The panel is easily removed by sliding it to the left. Be firm, but careful and it should come off relatively easily.
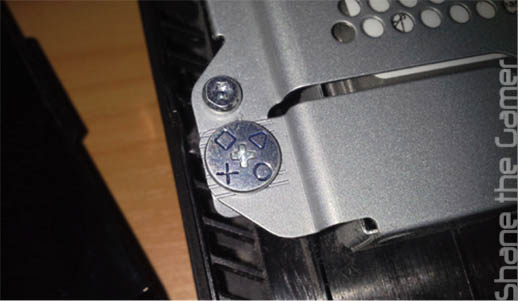
With the cover off, look for the lone screw with the PlayStation triangle, circle, cross and square on it. Unscrew it and put it somewhere safe.
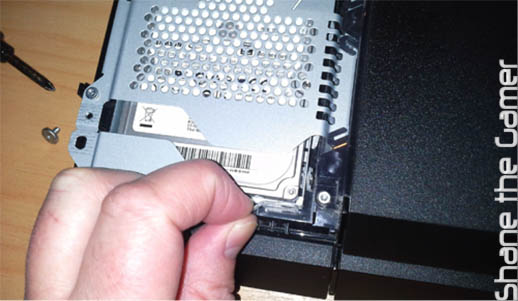
Carefully pull out the metal mounting bracket containing the hard drive.
Four screws hold the drive in the metal drawer. Unscrew them and put them somewhere safe.
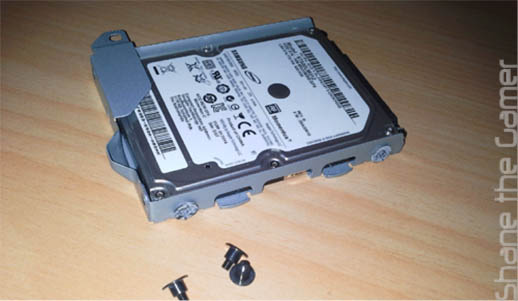
When removing the screws feel how tight they were. Remember this to ensure that you don’t over tighten them when you put it back together. Like when you play with the innards of any technology you must never over tighten screws.
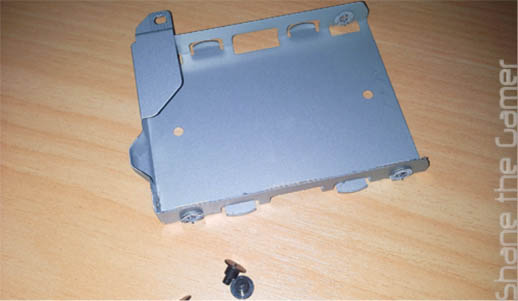
Be careful not to remove the rubber inserts from the screw holes.
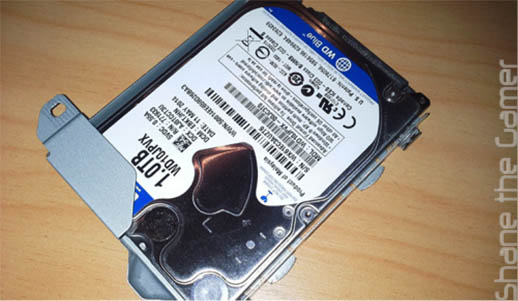
Place the replacement HDD on the mounting bracket and then attach using the screws.
Push the mounting bracket with the new hard drive attached back into the PS4. Be sure to fully insert the drive into the HDD bay.
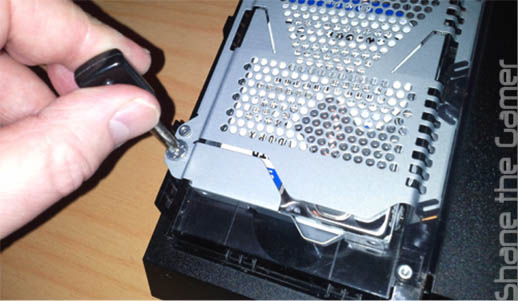
Secure the mounting bracket in the PS4 with the screw with the PlayStation symbols on it.
Replace the shiny panel and reconnect the PS4 cables, leaving the power cable until last.
Now that the hard drive has been replaced we need to reinstall the system software. With the PS4 still switched off insert the USB Stick with the software (in the correct labelled folders) into the console. Also, connect a Dualshock controller to the machine via USB cable.
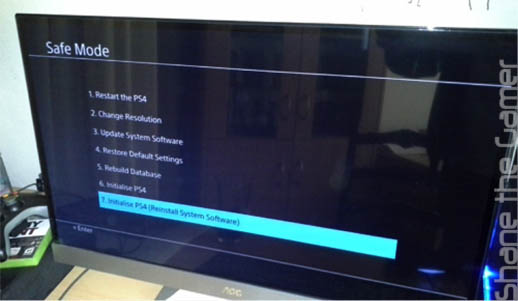
Press and hold the power button for about seven seconds. Release it after the second beep. It’ll ask you to press the PlayStation button on your controller and then your PS4 should boot to the Safe Mode Menu.
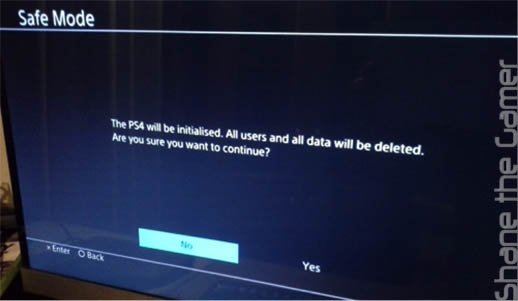
Select the last option on the screen [Initialise PS4 (Reinstall System Software)]. You’ll get a warning telling you that this action will delete everything. Well, there’s nothing on the drive to delete and you backed up everything that you wanted. You did, didn’t you?
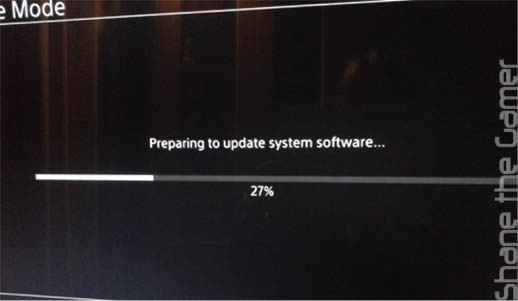
It’ll take a little while as the PS4 formats the new drive and installs the operating system. If everything goes well your PS4 will boot with factory settings.
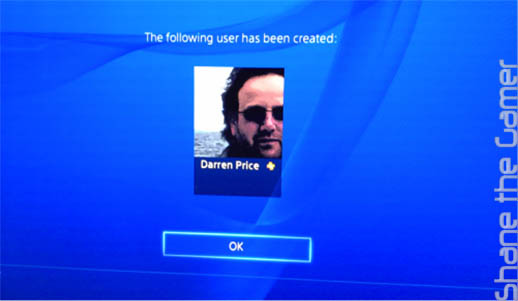
You are going to need to sign in to the PlayStation Network with the same account that you used to backup you data.
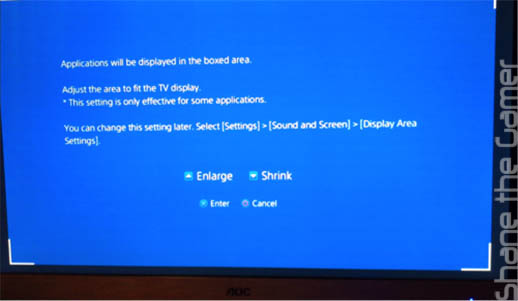
You’ll go through a whole host of initial setup things, like setting the time zone and screen area, that you probably remember from when you first switched on the console.
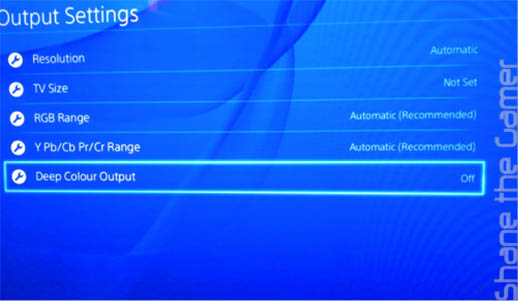
If you suffered from that annoying flicker post-update 1.7 you are going to need to change the Deep Colour Output setting from auto to off in the video output settings.
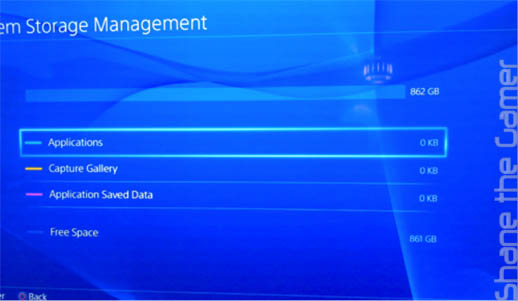
If you go to [Settings] > [System Storage Management] you’ll see your new hard drive capacity in all its glory. Unfortunately, due to a 1TB drive not actually being 1TB (1TB equals 10x1024MB and not the 10x1000MB that HDD manufacturers use in their marketing) and the PS4 system data taking up a fair amount of space we are only left with around 860GB. Still, it’s much better than it was.

Now it’s time to re-install your stuff. First you are going to need to install your games. You can’t download saves from the cloud for games that you don’t have installed.
As you know, the reason that we are having to swap out our PS4 hard drive is because the machine copies the games from the disk to the hard drive. Whilst it seems to only take a matter of seconds to install and get into the game, it can actually take quite a while.
The PS4 installs while you are playing the game. It does the same thing when downloading digital copies via the store. The console makes sure that the first part of the game is installed and ready to play right away. But in the background the rest of the game is still installing. FIFA 14 gives you a quick match between Real Madrid and FC Barcelona to play whilst the console completes the install.
For most new games you never notice that this is happening. When you reinstall a game that you are already some way into, you are likely to get a message telling you that the content isn’t ready yet and that particular part has yet to finish installing.
If you do get a message like that, nothing has gone wrong. It’s perfectly normal. Go away and make a cup of coffee or something. You game will be ready soon.
Reinstalling your games is likely to take longer than anything else in this process. The most efficient way of doing it, that I found, was to take it one game at a time.
Stick the game disk in the drive to get the initial few seconds of install done. Don’t start the game. Whilst that’s doing you can download your backed up game save from the PlayStation cloud.
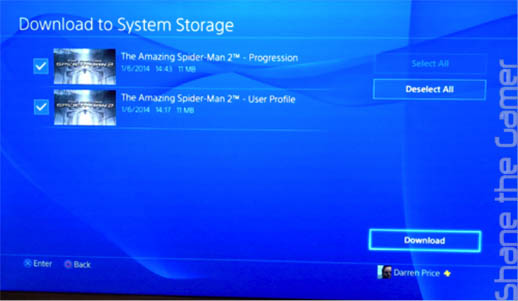
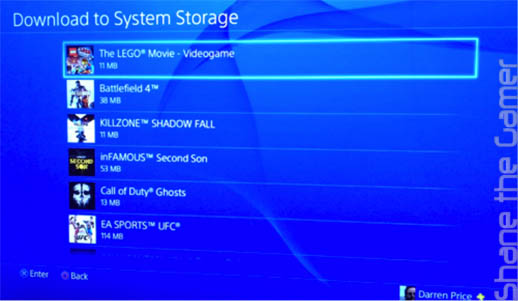
From the PS4 Menu go to [Application Data Management] > [Saved Data in Online Storage] > [Download to System Storage]. You then select your game [Select All] and [Download]. Do this for each game. If you backed your game saves to a USB stick select [Saved Data on USB Storage] from the [Application Data Management] page.
If you install your games like this you will avoid duplicate save files and it will all get confusing. Be mindful that most games have had an update or two since release. You are likely to get an update added to your download queue the first time you start a game. Until the update is finished and installed you are not likely to be able to use any online features within the gameplay.
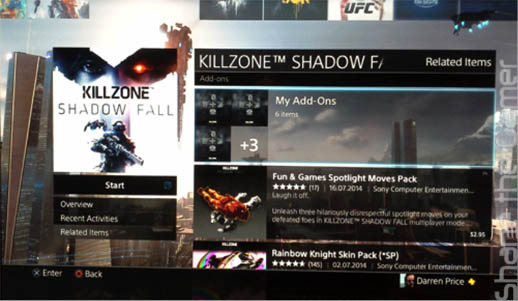
Also, don’t forget to re-download any DLC that you’ve purchased for your games. You can check this by highlighting the game on the PS4 menu, moving down and clicking “Related Items” and then clicking “My Add-Ons” panel to the right.
Don’t forget to re-register your portable devices such as your tablet and/or PlayStation Vita if you want to use them with your PS4.
And there you have it. All done.
And as always, if you are not confident to do this hard drive upgrade on your beloved console, then DO NOT attempt it.
While this tutorial shows you how and that it can be done, we do not recommend that you try this if you are unsure, unfamiliar with hard drives or afraid of anything remotely technical. As with all electronic devices, when parts are swapped out, things can go wrong.
Next I’ll show you how to upgrade your Xbox One’s storage space.